Monday, September 30, 2013

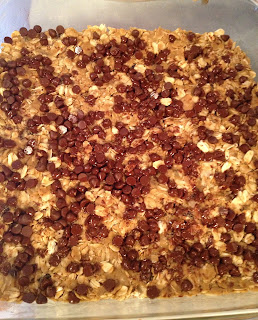
Heath Bar Crunch Cookie Bars


Happy Monday!  Today I am blogging about some fantastic Heath Bar Crunch Cookie Bars that I made last week. I was going to blog about them on Friday, for my Friday Dessert post, but instead this pink mama was in the emergency room all day!  After a very long Friday, at 2:00 a.m., I had my appendix removed during emergency surgery.  Not what you would call a fun weekend, but I am thankful to be healthy and at home with my family!  I am so blessed to have an amazing husband and father who sat with me at the ER all day long and an awesome mother and sister who stayed at my house with the girls all day long!  I am also equally fortunate to have a mother-in-law who stayed overnight with my girls so that John could be at the hospital with me!  And of course, I cannot forget my father-in-law and brother-in-law who brought me a delicious chocolate chip muffin (after not being allowed to eat for about 36 hours) and a huge stack of magazines to keep me busy!  God has blessed my life with two families who weave together to create a support system that is unparalleled!  I love you all!

So back to this fantastic dessert that you just have to make!  It is very special to me because my original Heath Bar Crunch recipe, which I will share at a later date, is the dessert that made John fall in love with me!  The first time I met him, I had made a batch of this awesome dessert.  He ate it and loved it.  I sent some home with him so that he would eat more of it at home, love it even more, and think about me enough to call me and ask me out...which was exactly what happened!  And the rest is history!

You already know that I love cookie bars, so I knew that I needed to make a cookie bar based on this dessert.  And I knew that the cookie bar needed to be easy and quick...using a cake mix as a base!


Here's What You Need to Make the Heath Bar Crunch Cookie Bars:

  • 1 box vanilla cake mix (I used French Vanilla...you can use vanilla/golden/yellow/etc.)
  • 1 stick butter, melted
  • 2 eggs, lightly beaten
  • 1/2 cup chocolate chips
  • 1 bag Heath Milk Chocolate Toffee Bits (you will find these in the baking aisle right next to the chocolate chips)
Now Let's Make the Heath Bar Crunch Cookie Bars:
  1. Preheat your oven to 350 degrees and grease a 9x13 pan
  2. In a large mixing bowl combine cake mix, melted butter, and 2 eggs until thoroughly incorporated
  3. Fold in chocolate chips and heath bits
  4. Spread mixture evenly into prepared pan
  5. Bake for 20 minutes
  6. Remove from oven and use the back on a spatula to press the cookie mixture into the pan (this creates a more cookie like texture)
  7. Return to oven for an additional five minutes
  8. Remove from oven and press down with back of the spatula again, flattening the cookie bars evenly (trust me this extra step makes them more dense and cookie-like)
  9. Place pan on rack to cool completely
  10. Cut into squares and Enjoy! 

Tuesday, September 24, 2013

Easy Pumpkin Muffins


For me, fall is all about Pumpkin Flavor!  If you have been reading my blog lately, you will have already seen my recipe for Pumpkin Bread.  That bread is a delicious and healthy "from scratch" recipe that will easily satisfy your pumpkin craving while getting you in the mood for the season!

This recipe for Easy Pumpkin Muffins uses a mix and only has 4 ingredients!  Yes, I said 4!!!  They are so simple to make that you can whip them up before the kids wake up, while the kids are napping, even during a TV commercial break!  They are also delicious!

Since I use a cake mix for a base, these are not "clean" or "whole food" based.  You can go back to my recipe for pumpkin bread if that is what you are looking for!  However, these are much faster to make!  They are also very light because they contain no eggs and no oil!

Here's What You Need to Make the Easy Pumpkin Muffins:
  • 1 box white cake mix
  • 1 can pumpkin (not pumpkin pie filling, just plain pumpkin like the kind by Libby's)
  • 1 tbsp pumpkin pie spice
  • 1 cup mini white chocolate chips
    Yup!  That's it! 


Now Let's Make the Pumpkin Muffins:
  1. Preheat your oven to 350 degrees and line 18 muffin cups with paper liners
  2. In a medium mixing bowl, stir together the cake mix and pumpkin until combined
  3. Add the pumpkin pie spice and mix well
  4. Fold in the white chocolate chips
  5. Divide batter evenly into muffin tins
  6. Bake for 20 minutes (until muffin tops are firm)
  7. Remove and cool completely in pans before turning out and storing 

These muffins came out fantastic!  They are healthy enough to eat at breakfast but sweet enough to serve as a snack or dessert!  Lacie has been enjoying them at afternoon snack time!


Now I will often tell you to use what you have in your pantry, and this recipe is no exception!  You could easily replace the white cake mix with yellow or vanilla cake mix.  If you do not have pumpkin pie spice, just use cinnamon/nutmeg/ginger to taste (and you can actually taste the batter because there are no raw eggs - YAY).  If you do not have white chocolate chips (or you do not like white chocolate) you can use regular chocolate chips!  I love the mini chips because they really melt into the cupcake, but regular size chips would work too!  You can even leave out the chocolate chips or replace them with nuts (like Pecans or Walnuts).  We avoid tree nuts at this point because of Lacie's peanut allergy plus they create a choking hazard for kids under the age of 4!  However, you should use what your family likes best because that will usually be the ingredients that you have on hand anyway!

By the way - these freeze great!  Just wrap each muffin individually in saran wrap and place into a freezer bag!  Then pull out one at a time when you need something to throw in a lunchbox or want a quick breakfast on the go!

Enjoy!

Monday, September 23, 2013

Weekend Review

Happy Monday!  It was freezing in New Jersey this morning!  I think I was being optimistic when I decided to leave half summer clothes and put half fall clothes in the girls' dressers...looks like I will be packing away all of the cute dresses and shorts outfits until spring!  Even though I don't love the cold weather, I do love fall holidays, so I thought that it was time to put the girls in their first Halloween outfits of the season!  This will be Blakely's first Halloween!  It is her only "first" holiday left before she turns 1!!

It is getting increasingly hard to get them to sit together long enough for a picture!!! 

Sweet B


We had a busy and fun weekend even though we were missing Daddy!  John was away in Memphis, TN with his dad and his brother!  So the girls had lots of quality time with Mommy, Nana and Pop-Pop (my parents), Aunt Laura, and Grandmom (John's mom).  I am so blessed with a family who is always willing to come over and help out or just keep me and the girls company!  What do I need help with you may ask?  See Sweet Blakely in that picture up there?  Yeah, she's not so sweet at bath time!  Someone needs to hold her down while someone else washes her hair!  I love her always in spite of that. 


On Saturday, I took Lacie to Sesame Place for some one on one time with Mommy!  She always has a blast riding the carousel!  As soon as the carousel starts slowing down she is already saying "More" "Again" and her newest "Lacie's Turn" while she points to herself!  


The girls and I also went out for a bit of shopping!  Imagine my surprise when I picked up this wrapped cookie in the check out line at the Barnes and Noble Cafe (mama needed a coffee) and the back of the cookie stated that it was "Nut Free."  Needless to say, I had to buy one for Lacie!  Little things like this make food allergy mamas so excited! Lacie enjoyed every single bite!  Way to go Barnes and Noble for being inclusive for people with peanut and tree nut allergies!


I found this gem on an end-cap in Wegmans!  I love Funfetti, and I love it even more when it is holiday or seasonally themed!  So I decided to mix up a batch of Lacie's Lazy Funfetti Cookie Bars to surprise John with when he got home (which he promptly ate 3 of along with a cup of coffee).  The only thing I changed was using regular milk chocolate chips instead of white chocolate chips!  I felt the look of the chocolate went better with the Halloween theme! 

YUM!!!

Tomorrow, I will be sharing an easy pumpkin muffin recipe!  Have a Happy Happy Monday!


Friday, September 20, 2013

A Healthy Snacktime - Kale Chips


Kale seems to be a super popular veggie at the moment.  I've already disclosed that I do not like many vegetables...  Now fruit I love, I could eat fruit all day!  Veggies not so much!  But everyone is talking about how great kale is - kale chips in particular.  So I made them and gave them an honest try.  They're okay and I will eat them in order to get in a serving of veggies....

But guess who LOVES kale chips???  Lacie Jane!  She eats them with enthusiasm!  I truly believe that she is the least picky child on this planet!  Now before you say that you hate me - don't worry - Blakely makes me work up a sweat at every meal with her pickiness...so it's not all roses at the dinner table at our house!  When it comes to Lacie I think we just got lucky with a kid who loves to eat anything from desserts to veggies with an equal amount of excitement.  Seriously, last night Lacie got to eat one of these Butterscotch Neiman Marcus Bars for dessert...and do you know what she did when she finished the bar?  She searched around her bib and her highchair to find a few fallen peas from dinner and ate them too!


Now back to the Kale Chips.  They are super simple to make, but only make as much as you can eat in one day because they don't store well.

Here's What You Need to Make the Kale Chips:

  • 1 bunch of Kale (I used organic)
  • extra virgin olive oil
  • Himalayan Pink Salt (see picture below) or sea salt 
Now Let's Make the Kale Chips:
  1. Preheat your oven to 300 degrees
  2. Remove ribs from your kale and tear into small pieces
  3. Rinse kale well and dry (you can use a salad spinner to make this step a breeze)
  4. Spread kale on a rimmed baking sheet and drizzle with olive oil (I use a refilable spray bottle - it was $5 at Wegmans - with EVOO to make sure the kale gets coated evenly...see picture above)
  5. Sprinkle with salt 
  6. Bake in oven for 15 to 20 minutes until crisp (your cook time will depend on how much kale you put on your baking sheet)
Enjoy on the same day you make them!  They get kind of soggy if you try to store them...and that really takes away from the "chip" aspect!

Happy Happy Friday! 

Thursday, September 19, 2013

Blakely's Butterscotch Neiman Marcus Bars


I love any type or bar - cookie bars, candy bars, etc.  I also love to use cake mix as a base for whipping up a quick dessert recipe!  Enter this delicious recipe for Butterscotch Neiman Marcus bars that I found at Mix and Match Mama's blog.

What are Neiman Marcus Bars?  They are a cookie bar with a cheesecake type layer...except the top layer never fully sets so it's creamier than cheesecake!!  They are gooey and delicious!  I have also heard them be referred to as Chess Squares, Gooey Butter Bars, and Texas Gold Bars.

I don't think that I have had a Neiman Marcus bar since college, but after coming across the recipe for them I haven't been able to stop thinking about making a batch!  These bars are super easy to make!  You start by making a dough with boxed cake mix, butter and eggs - just like in my funfetti cookie bars!  But then you add a delicious cream cheese topping which makes these bars gooey and wonderful!  Add in butterscotch flavor, and well, they are just fantastic!

Here's What You Need to Make Blakely's Butterscotch Neiman Marcus Bars:


  • 1 box yellow cake mix
  • 1 stick butter, melted
  • 4 eggs
  • 1 box powdered sugar
  • 1 block cream cheese, room temperature
  • 1 bag of butterscotch chips
Now Let's Make the Bars:
  1. Preheat your oven to 350 degrees and grease (I used Pam) a 9x13 pan
  2. Mix together your cake mix, butter, and 2 of the eggs (this is your first layer)
  3. Press this mixture evenly into the greased pan
  4. In a stand mixer combine cream cheese, powdered sugar, and 2 remaining eggs (you can also use a hand mixer - I just LOVE my kitchen aid stand mixer - it's PINK)
  5. Now put 1 cup of your butterscotch chips in a microwave safe bowl and melt in the microwave (I did mine on 50% power for 1 minute) and beat the melted butterscotch into the cream cheese mixture
  6. Fold in the rest of the butterscotch chips and pour this mixture on top of the crust
  7. Bake in oven for 35 to 40 minutes - the edges should be brown while the center is still wobbly
  8. Cool on your counter for 30 minutes then place in the fridge for at least two hours


They are amazing!  I had to give away half so I didn't eat them all by myself! 

Wednesday, September 18, 2013

Taco Pasta Bake


About a year and a half ago, I signed myself up for a Pinterest account!  I was so excited to have discovered this site - a site where I could keep track of all the recipes that I found online!  No more printing out recipes and then storing the papers in a binder...nope all of the things I wanted to make would be nice and organized on this neat online pin-board!  The very first recipe I ever pinned and tried to make was for Taco Pasta Bake (it is a pretty popular pin).  I was super excited to make it, and I was even more excited to taste that very first bite!  But I was disappointed, and John didn't love it either.  However, I knew that the idea was good...so like usual I changed around a few things and came up with an AMAZING recipe that was much closer to what I had imagined that first bite to be!

Here's What You Need to Make the TACO PASTA BAKE:

  • about 3/4 box penne pasta (I always use 100% whole grain)
  • 1 pound lean ground beef (you can also use ground turkey)
  • 1 packet of taco seasoning (I use Old El Paso Low Sodium)
  • 2 cups water
  • 6 ounces cream cheese, cut into small cubes 
  • 3 cups shredded mexican cheese
  • extra virgin olive oil (for cooking the meat and greasing the pan)
Now Let's Make the Taco Pasta Bake
  1. Preheat your oven to 350 degrees and coat a 9x13 casserole dish lightly with oil
  2. Cook penne pasta in a large pot of salted, boiling water - cook pasta until about 3 minutes shy of al dente (it will cook more in the oven)
  3. Meanwhile in a separate pan, cook your ground beef in a bit of olive oil, crumbling and browning the meat until cooked through
  4. Add your packet of taco seasoning, water, and cubed cream cheese
  5. Stir the mixture until the cream cheese is melted
  6. Add pasta to the meat mixture
  7. Pour everything into your greased casserole dish
  8. Sprinkle one cup of mexican cheese over the top and stir lightly to distribute cheese throughout the casserole (the casserole will look soupy- see picture below - but the liquid gets absorbed during the cooking, creating a delicious and creamy casserole)
  9. Sprinkle remaining two cups of cheese on top 
  10. Bake in oven for 30 - 40 minutes until casserole is done to your liking
  11. Allow to sit and cool for about 5 minutes before serving
When you first pour your pasta/meat/cream cheese mixture into the pan it will look soupy like this but do not panic!  That extra liquid will help the pasta to finish cooking and make your casserole delightfully rich and creamy! 

Your casserole will look like this when done!  Do you see all of that delicious cheese on top?!?

John and I enjoyed our casserole on the couch while watching that days episode of General Hospital (don't judge)!  

I love love love my version of Taco Pasta Bake, and I know that you will too! It is perfect for the cool fall and winter weather!  Plus this makes a lot!  It will feed a large family or a small family with leftovers! 


Monday, September 16, 2013

Mexican Stuffed Peppers and Happy Monday

Happy (rainy) Monday to all my blogies!!!  Yesterday, we celebrated Sweet B's 10 month birthday (yes we celebrate by the month for the first year in our house)!  Daddy had to work which was a bummer, especially on a Sunday, but we squeezed in a quick photo shoot when he got home!

Our sweet girl is getting so BIG! 

She won't sit still for very long anymore! 

When we woke up today, it was off to Target in the rain to get professional pics done!  We did them every month for Lacie's first year and are doing them every month for Blakely's first year too!  After they turn one, we do pics for each half birthday and birthday as well as some holidays!  I know that right now you are thinking to yourself - That's a lot of pictures!  Oh my goodness it is a lot!  I didn't really think it through when I decided to start doing it with Lacie...but once I start something I see it through!  Poor B hates the monthly pics.  Here she is showing off how well she stands on her own while also looking terrified!  Sorry Blakely, one day you will appreciate that Mommy made you take so many pictures! 

Meanwhile, here is my other child, who just couldn't resist jumping in front of the camera and doing her best "cheese" face!  Please pardon her hairstyle...it really looked nice before we ran out of the house in the pouring rain! 


Okay, so back to the meal of the day!  I absolutely LOVE LOVE LOVE this stuffed pepper recipe!  Now you may be shocked by this, but I am not a huge veggie person.  I would much rather eat carbs (or dessert)!  But sadly as I get older, an all carb diet just isn't cutting it...plus I really want to set a good example for my girls!  So John and I have been making an honest effort to eat more veggies!  And these stuffed peppers are delicious and super simple to make!  Plus, with so many opportunities to use what you have by making substitutions (I suggest a few below), you can whip this recipe up tonight with whatever is in your fridge and pantry! 

Here's What You Need to Make the Mexican Stuffed Peppers (this recipe makes 3 whole peppers - 1 for me and 2 for the hubby - it can easily double or triple for your family)
  • 3 bell peppers (I used 1 red, 1 yellow, 1 green)
  • 1/2 pound lean ground turkey (you can use ground beef, ground pork, sausage, shredded chicken, etc.)
  • 1 cup frozen corn (canned in fine too)
  • 1 cups black beans drained and rinsed (use any beans you have on hand)
  • 2 tsp. garlic powder (more or less to taste...you can even use fresh I just didn't have any)
  • 1 tsp cumin
  • 1 tsp chili powder
  • salt and pepper to taste
  • 1 - 2 cups shredded cheese (I used Monterey Jack but Cheddar or Mexican Blend works just as well)
  • extra virgin olive oil 
Now Let's Make the Peppers
  1. Preheat your oven to 375 degrees
  2. Slice peppers in half longways (top to bottom) and remove seeds and ribs
  3. Place peppers cut side up in a 9x13 casserole dish and drizzle with extra virgin olive oil
  4. Bake in oven for 25 minutes or until done to your liking - I really like mine to still have a nice bite to them
  5. While the peppers are baking, cook, crumble, and brown your ground turkey in a pan with a little EVOO
  6. Once cooked through add in frozen corn, stirring for a few minutes until thawed and warmed through
  7. Stir in black beans 
  8. Add seasoning (garlic, cumin, chili powder, S&P) and stir to distribute spices evenly
  9. Remove peppers from oven and preheat your broiler
  10. Spoon filling into peppers 
  11. Sprinkle cheese on top - a little or a lot
  12. Place peppers under broiler to melt cheese - keep your eye on the peppers they will go from done to burnt cheese super fast (I like my cheese to be bubbling and slightly browned)
YUM!!!


Friday, September 13, 2013

Funfetti Magic Cookie Bars


Many of you have probably heard of/made/tasted magic cookie bars at some point in your life!  I love magic cookie bars, but John does not because he doesn't like coconut.  So I came up with a magic cookie bar that does not use coconut (or any other nuts for that matter).  In my opinion, any bar that uses sweetened condensed milk in order to give the bars that magical gooey top-crust qualifies as a Magic Cookie Bar!  These are even better because they use Funfetti cake mix as the base for the crust.

Why did I decide to make this recipe as our weekend treat?  Let me tell you!  Yesterday, while the girls were napping I made two loaves of my wonderful Pumpkin Bread.  I made it because John was working super late, and I knew he would want a snack when he got home.  John has been asking for pumpkin bread since Septmeber 1st!  So when he walked in the door at 8:30 p.m. (after having left for work at 5:50 a.m.) I said "Guess what I made for you?!?"  Do you know what he said...."Funfetti Cookie Bars?!?"  Now of course, he was still grateful and happy with the pumpkin bread, but I knew that he was craving funfetti!  Since I just made my standard Funfetti Cookie Bars two weeks ago, I decided that today I am making Funfetti Magic Cookie Bars!

Full Disclosure Time: these are not the prettiest bars.  They are gooey and hard to cut up into perfect squares.  So they may not be the type of dessert that you want to make to display at a party!  They are, however, the perfect dessert to make for a night at home with the hubby or a girls night in!  They are super, super sweet!!!

Here's What You Need to Make The Funfetti Magic Cookie Bars:

  • 1 box funfetti cake mix (like the kind by Pillsbury)
  • 1 stick butter, very soft 
  • 1 egg
  • splash of vanilla extract
  • 1/2 cup each white chocolate, semi-sweet chocolate, and butterscotch chips
  • 1 can sweetened condensed milk
  • 1/2 cup cookie butter spread (I use Biscoff brand because it is Peanut Free for Lacie - this stuff tastes AMAZING so if you haven't tried it go out to the store and get it - NOW!)

Now Let's Make the Bars:
  1. Preheat your oven to 350 degrees and grease or spray (I used PAM) a 9x13 pan
  2. Make your crust by mixing together the cake mix, butter, egg, and extract - this will be very thick
  3. Press dough into pan evenly
  4. Sprinkle all three kinds of chips over top on crust and use your fingers to press lightly into crust
  5. In a mixing bowl (I used the same bowl - less dishes) combine cookie butter spread and sweetened condensed milk
  6. Spread cookie spread mixture on top of crust and chocolate chips
  7. Bake in oven for 25 minutes...do not over bake...it will be gooey
  8. Allow to cool completely on cooling rack before cutting into bars and storing


Good luck waiting for these to cool before eating them!  Your house is going to smell amazing, but you really should wait for them sit out and set up a bit before cutting.  However, if you want to grab a fork and sample a bit off the edge...well I won't tell anyone! 


Thursday, September 12, 2013

Pumpkin Bread

Pumpkin!!! Nothing says fall quite like the flavor of pumpkin!  I love pumpkin in many forms, so you can expect to see quite a few pumpkin recipes on my blog this season.  One of my all time favorite ways to enjoy pumpkin is by making Pumpkin Bread!

A few years ago I needed to find a good recipe for pumpkin bread, so I went over to my kitchen bookshelf (yes I have a bookshelf in my kitchen) and grabbed one of my many Williams Sonoma cookbooks.  I adore all of the WS cookbooks, and I spend a lot of time paging through them to look at the beautiful pictures.  However, I don't really ever make any of the exact recipes because I love to put my own spin on things!  This recipe is very loosely adapted from a pumpkin bread recipe in this book:


What You Need to Make the Pumpkin Bread:
  • 1 cup canned pumpkin (not pumpkin pie filling)
  • 1 cup raw sugar (but really any kind is fine - white, brown, raw, etc.)
  • 1/2 cup extra virgin olive oil
  • 2 eggs
  • 1 3/4 cup whole wheat flour
  • 1 tsp baking soda
  • 1/2 tsp baking powder
  • 1/2 tsp salt
  • 1 tsp cinnamon*
  • 1/2 tsp nutmeg*
  • 1/4 tsp ginger*
  • 1/4 tsp ground cloves*
  • 1 cup semisweet or dark chocolate chips
Now Let's Make the Pumpkin Bread
  1. Preheat oven to 350 degrees and grease two 1-pound loaf pans (you can also bake in 1 large loaf pan that is at least 1.5 lbs or even use cupcake pans if you would rather have muffins)
  2. In a stand mixer, whisk together pumpkin, sugar, oil, and eggs
  3. In a seperate mixing bowl combine flour, baking soda, baking powder, salt, cinnamon  nutmeg, ginger, and cloves - I whisk the dry ingredients together but feel free to sift them if you prefer
  4. Add dry ingredients to wet ingredients, mixing on low speed until well combined
  5. Fold in chocolate chips - your batter should be thick but not lumpy
  6. Add batter to prepared baking pans
  7. Bake in oven for 35 minutes - your house will smell wonderful - until bread is cooked through and cracks appear at the surface (muffins would probably take about 20 minutes while a large loaf would take 50-60 minutes)
  8. Transfer pans to wire rack and cook for 10 minutes in pan
  9. Remove bread from pans and cool completely
*if you do not feel like measuring all of these spices (or if you do not have them) you can substitute 2 teaspoons of Pumpkin Pie Spice or simply use 2 teaspoons of cinnamon (although it will not have as much flavor) 

I hope that you enjoy my adaptation of this delicious Williams Sonoma recipe!  I made it healthier than the original by reducing the amount of sugar by a half of a cup and using whole wheat flour instead of regular!  I also changed the type of oil used (it originally called for nut oil which we avoid because of Lacie) and switched out dates for chocolate chips! 

  Enjoy!  I will be eating devouring my slice with some Pumpkin Coffee!

Lacie LOVED it!

Even Sweet B got a taste!


I own two of these loaf pans and use them for all of my quick bread recipes!  I have had them for five years and I just love love love them!  

Wednesday, September 11, 2013

Homemade Granola Bars in 15 Minutes


Raise your hand if you have a box of granola bars in your pantry right now!!!  For me, granola bars were a staple growing up.  My mom always had some on hand for a quick snack or as a meal replacement because I was an extremely picky eater.  In college, granola bars were in my dorm room.  When I became a wife, they were always on my grocery list!  Then I turned that box of "healthy" granola bars over and <shock> there was a list of at least twenty ingredients...definitely a few "unhealthy" sounding ingredients.

At this point, I knew that I wanted to make my own homemade, healthy granola bars.  So I googled and went on Pinterest.... And I did find lots and lots of recipes for homemade granola bars.  But those recipes all called for a lot of ingredients too!  They also had a long list of directions.  They also, almost always, called for peanut butter, peanuts, or tree nuts!  We avoid peanut butter like the plague in our house!  We also use very limited amounts of tree nuts in our cooking because it is so hard to find nuts that are not cross contaminated with peanuts!

So I had to make my own recipe for granola bars!

6 ingredients!!  That is all you need to make my healthy, peanut free, school friendly granola bars!  Out of those six ingredients, you really only need 4, the other two are optional (or can be switched out to include an ingredient of your choosing)!  Did I mention that these granola bars do not require you to turn on the oven!

What You Need to Make the Granola Bars:

  • 1/2 cup to 1 cup honey (it really depends on how sweet you want these to be...I use closer to 1/2 cup)
  • 1 cup sunflower seed butter (use any type of nut or seed butter that works for your family)
  • 1 tbsp coconut oil (you can use veggie or canola oil if you prefer)
  • 3 cups rolled oats
  • 1/2 cup raisons (optional) 
  • a handful of mini chocolate chips (optional) 
Now Let's Make the Granola Bars
  1. Grease a 8x8 or 9x9 pan and set aside (you can also line with foil or parchment paper)
  2. Stir honey and sunflower seed butter in a sauce pan set over low heat on the stove
  3. Once combined and slightly "liquified" add in coconut oil and stir
  4. Remove from heat and add in raisons (if using) and rolled oats
  5. Press mixture into prepared pan, spreading evenly
  6. Sprinkle mini chocolate chips (if using) over top and press down (they will melt slightly and "stick")
  7. Set pan aside for several hours, or overnight, to set up
  8. Cut into "bars" and wrap individually to store

Now when I was describing these bars, I did share that you could make them with only the honey, sunflower seed butter, coconut oil, and rolled oats.  I did that the first time I made them, and they were very plain but still delicious.  Lacie ate them up!  However, I thought they needed more which is why I added the raisons and the mini chocolate chips.  Please feel free to switch the raisons for a different ingredient, like dried cranberries!  Play with flavor combinations and figure out what you and your family like best!  

Don't forget to share what you put in your granola bars! 

Tuesday, September 10, 2013

Sunny Days Muffins


This week and last, my Facebook newsfeed has been flooded with Back to School posts, both by teachers and parents!  I can hardly believe that we have reached that time of year again!  I feel so blessed that right now I get to be at home with my baby girls rather than beginning a new year of teaching kindergarten!  I am also extremely grateful that I have three more years before Lacie skips off to her first day of kindergarten!

All of the back to school madness has inspired me to share a few recipes that will help with packing lunches and snacks as well as those quick grab-and-go breakfasts!  Yesterday, I shared my recipe for Double Chocolate Muffins.  Today you were going to see a recipe for homemade granola bars.... But there were a few overripe bananas sitting in my fruit bowl so I did a last minute recipe change!

We eat a ton of bananas at our house, and they rarely get the chance to become too ripe!  However when that does happen, I have a few go-to recipes to use up those bananas so that they do not go to waste.

One Overripe Banana = Healthy Oatmeal Cookies
Two Overripe Bananas = Sunny Days Muffins
Three Overripe Bananas = Banana Bread

Well, today there were two bananas!  So you will be reading all about my Sunny Days Muffins!  I called them "Sunny Days" because I make them with Sunflower Seed Butter for my Peanut Free Princess (who happens to love Sesame Street right now).  Now I specifically use Sunbutter brand in the "Natural Crunch" variety which has actual sunflower seeds in it.  You can use whatever type of nut or seed butter your family eats.  Using the sunflower seed butter makes these muffins nut free and school friendly!  They also happen to be egg free as well!

What You Need to Make the Sunny Days Muffins:  

  • 2 mashed bananas
  • 1/3 cup coconut oil (when making healthy recipes I only use coconut oil or extra virgin olive oil - you can use any type of oil or even 1/3 cup melted butter)
  • 1 tsp vanilla
  • 1/4 cup sunflower seed butter (see above paragraph) 
  • 1/4 cup raw sugar (I like Sugar in the Raw brand but you can use any type of sweetener that you enjoy)
  • 1 1/2 cups whole wheat flour
  • 2 tsp baking powder
  • 1/2 tsp salt
  • 1/2 tsp cinnamon
  • 1/2 cup dark chocolate chips

Now Let's Make the Muffins:
  1. Preheat oven to 350 degrees and line a 12 cup muffin tin with paper liners (you could also grease or spray the muffin tin if you prefer)
  2. In a large mixing bowl combine oil, mashed bananas, vanilla, sunflower seed butter, and sugar.  
  3. In a smaller mixing bowl whisk together the whole wheat flour, baking powder, salt, and cinnamon
  4. Add dry ingredients into wet ingredients and stir to combine (the batter will be thick but do not over mix)
  5. Fold in dark chocolate chips
  6. Spoon batter evenly into muffin tins
  7. Bake for 15 to 20 minutes until done
  8. Cool for 10 minutes in pan then transfer to cooling rack and cool completely 

Enjoy!  These are the perfect breakfast or snack!  They also freeze well if you want to make them ahead of time!
I enjoyed one at my desk while writing this post :) 

LinkWithin

Related Posts Plugin for WordPress, Blogger...